Hey there! Here's a quick tutorial on how to apply a colorful patina on metal.
Supplies:
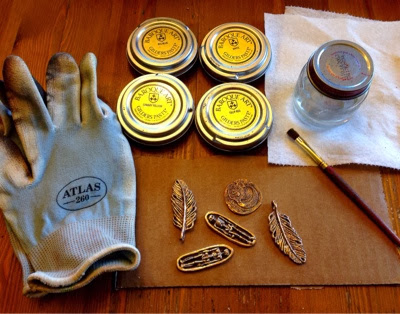
•Gilders paste in your choice of colors ( I use four: tulip red, iris blue, white and canary yellow - from this palette you can get every color). I bought mine from Rio Grande on the website: www.riogrande.com
•Paint thinner
•Gloves, I use non slip fabric gardening gloves by Atlas
•Cheap paintbrush
•Paper towels
•Cardboard work surface
•metal charms - I use this technique on my pewter and bronze beads and expect this to work on any metal.
First, get everything ready and work in a well lit, well ventilated area. Use a fan, since the paint thinner can give you a headache.

Dip the brush in the thinner and work into the paste cake, you don't want to soak the cake, just wet it enough to pick up some color. I use the lid as a palette to mix colors, wipe it off when the lid gets murky.

Apply the color over a clean metal charm, using the brush to scrub the patina into the recessed areas. Its easy to get lots of variations in the color, just dab a coordinating shade next to one already applied and blend. This part should be fast, don't agonize over it, get the patina on and move to the next one.

I work in an assembly line, quickly brushing on the paste, keeping my brush somewhat clean by dipping it into thinner and wiping it on a paper towel.

The colors shift between pieces, because I'm wetting the brush in thinner and picking up a little paste, mostly mixing on the piece itself. This method will give lots of variations, if you want pieces to match, premix a dollop of color on the lid.

Wait 5-10 minutes, then use a paper towel to remove the excess color. If it's still a bit damp, more will come off, giving a more subtle look. The drier it is, the harder it is to remove, although the high points of the design will polish readily.
I put on gloves while handling the pieces, because I don't like my fingers to get stained. Plus, it helps grip little charms.
