Sunday, May 08, 2011

Sheila's store


Look at this lovely print I purchased from my sister Sheila! I think it would look great in my collection of drawings, paintings and prints I've gathered over the years. She just opened a storefront on etsy.com called sthorntonart and has some of her paintings and prints for sale. Many are paintings she made while traveling to far flung locales like India or Thailand, while others were created closer to home, in Venice Beach, FL. She has a beach painting I immediately recognized as her secret shark tooth gathering spot, a lovely, quiet patch of beach she took us to a few weeks ago. I like that aspect of her work, the element of intimacy and connection, of knowing these are pictures from an artists life, seen and captured.

Saturday, May 07, 2011

new stamps for Andrew


These are polymer test copies of the new stamps I carved for Andrew. Remember a few months ago I asked what folks thought I should make to help Andrew with his cancer bills? Well, a lot of folks mentioned making a painting, or a doll, which are good ideas, just a tiny bit too time consuming. Those things take ages to make, especially when my time is so limited, so he wouldn't see money for awhile. He thought the stamps would be a good idea since he could produce them himself. We talked about what designs to make and spent a pleasant afternoon sketching and drinking coffee. We agreed on these designs (although the serpent is a fun extra I knew he would like!) and I just finished carving them last night. I will carve more designs for GGS to debut at Bead and Button, but these little lovelies will only be available at Andrew's shop.

winners!

Ok! That was exciting! It also proved enlightening, as far as taste trends are concerned. There is definitely a strong pull towards detailed focals on simple settings. I wonder if this sway towards simplicity has to do with warmer weather? It's hard to say for me, since I love both ornate and simple jewelry year round. This little contest has inspired me to make some intricate pendants, ideal for threading onto some chain or ribbon.
And now the winners! The grand prize of a mechanical owl pendant goes to Patty of the Ornate Blue Bead! I think my brother Andrew was right, another prize should go to the runner up, Ann.
The drawing winner from the votes goes to #45 Heidi! To claim your prize, send me an email with your shipping address. All this month I'll be doing giveaways, so check back soon!

Thursday, May 05, 2011

which should I pick?


Hi! I meant to announce the winner, but I have to admit I'm torn. Which of these should win? Cast your vote in the comments section. The first is by Ann Cruzen:

"I mixed the colors using the closest shades I had on hand to your recipe and I liked how they turned out. To me they had a rich medieval tone ( my husband thought I had some berries on the baking tray!) .
So then my first thought was to use your "dragon bead" but the studded beads reminded me of the mechanical owl which I thought fitting to use an owl bead. My husband loaned me his wire cutters and I *may* owe him a sharpening as I think I nicked them cutting the nails for the studs! "


I'm drawn to the shape of the piece and the intricate wire work around the owl, which perfectly sets it off. The varied use of mixed color metals is an interesting design element, making it more wearable with either gold or silver. The studded beads are also very nicely shaped and luminous looking. Well done, Ann!


This entry is by Patty Gasparino:

"I hope it's not too late I was dying to do this! This is one of my favorite books!!!

I only had a few days so it's not as polished as I would like - I used your sweet bird toggle and simple chain.I will be blogging about this tomorrow. "

Blog:
http://www.mylifeunderthebus.typepad.com/
Shop:
www.etsy.com/shop/thejunquerie
Fan Page:
www.facebook.com/#!/MyLifeUndertheBus


I love the simplicity of design in this piece, which is a great counterpoint to such an intricate bead. The sweet robin's egg blue of the clay is one of my favorites, as it goes so well with silver. The use of the flowers along with the nail heads is really creative and looks fantastic! Great work, Patty!


OK, let's decide together! This was a fun project and i enjoyed seeing the entries. VOTE and one the votes will WIN A PRIZE! I'm feeling festive, gearing up for Bead and Button and nothing says 'festivity' like a giveaway.

Monday, May 02, 2011

weekend at the farm


We spent a lazy weekend at our friend Carter's family farm in Ridgeway, SC for a festive pig roast. The farm is over a hundred acres of forest and trails, perfect for wildflower gathering and the occasional ride in a four-wheeler. Azalea and I tried not to monopolize the hammock, but it was pretty comfortable.


Doesn't Max look like he's fishing on a raft? My little camera has a 'toy camera setting' that gives the edges a grainy look, like photos from the seventies. I like the look, it reminds me of pictures from my youth.


I spotted this brilliant flower growing in the deep shade of the forest and was surprised by the almost glowing yellow set against the browns of last year's leaves.


Our dog Suni came along for the fun and ran wild through the woods, coming back to sit with us under the shade between runs. It was particularly sweet to see how she stayed near Max when he napped under a tree, or when I would let him wander a bit, she was right by his side. Those two are already best friends. I think I may have to paint them together!

inspiration


This picture was taken last week at the arboretum. We go there late in the day, when its quiet and most folks are leaving. Late afternoons are my magic hours, when my best ideas bubble to the surface. I'm always ready with a camera in one pocket, sketchbook in the other.


I love the shape and color of this plant. I can't remember the name, something with 'fire' in it and probably from Mexico, but I thought it would make a nice pendant.


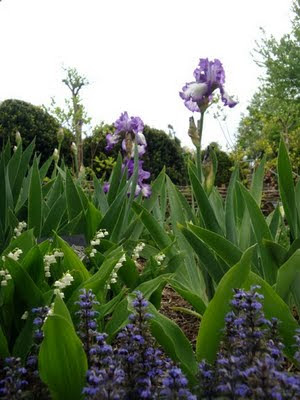
I've been meaning to sculpt lily-of-the-valley and iris's for years....maybe this is an sign to stop thinking about it and do it.


I've made stamps of fiddle head ferns and columbines, but only for limited edition pieces, never full production. I keep seeing them everywhere, growing wild between rocks, along sidewalks and against old, dilapidated buildings. There's something a little sad about their drooping heads and impossibly thin stems, but in a sweet way, like they are determined to grow no matter what.


I like this picture of Andrew, doesn't he look like he's thinking of something poetic and heartbreaking? But knowing him, I'd say he's thinking more about what our next food adventure will be!


Azalea looked so small sitting in the center of all those pansy's. She's a good girl, sketching her favorite flowers and making up stories about them.


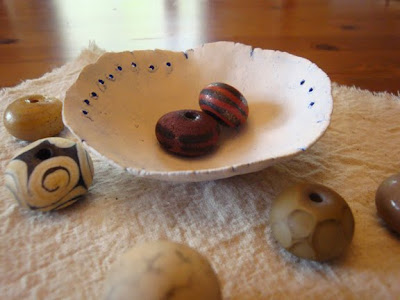
When our friend Kathy Van Kleeck comes over, its always a good time- she's fun and knowedgeable and time just flies past. I find that when she leaves, I can't wait to get into the studio to make things. Some artists have that effect on people, maybe its the excitement for the materials, or the willingness to share information. Above is a picture of delicate pinch pot she gave to me to put little treasures in. I love how every fingerprint and indentation is accented by a blue wash of color, giving it a luminous glow in sunlight. The lovely beads it holds are from the talented JoAnne Zekowski of "Z Designs in Glass" E-mail: rzekowski@mindspring.com.

Sunday, April 24, 2011

great etsy craft finds


WhoKnowsWhat Aren't these metal flowers great? I'm not sure what I'll do with them, but I think they'll be a fun component in a project (like attached to a chandelier, wire wrapped around a mirror or frame or separated to use in a necklace).


IUsedToBeATree I bought these to make kokeshi dolls for the kids, since the first batch I made for Azalea came out so well. These blanks are perfectly smooth and don't require any sanding, just grab your paints and get started! I use acrylic paints and mediums to the paint faces and clothes and seal the surface with matte or satin varnish. I'm so excited to paint these! I think an ocean creature theme would look interesting.


Giant Dwarf This felt is really pretty! The felt is made from a blend of tencel and wool fibers, making it naturally soft and sturdy. It's thinner than regular wool felt and thicker than polyester felt. I have lots of ideas for this stuff! Doll clothes, flower hairpins and small bags for gifts. I'd also like to see if this felt could be used with mohair wool, as prefelts.


I love finding good sources, especially if they support small businesses in the U.S. All the photos are from the listed shops.

saddlebag


Check out this customer picture! The new winged skull was sewn onto a leather saddlebag that fits on a motorcycle. I think it looks perfect. Seeing this bag reminded me of some red leather I've been stowing away until inspiration strikes. I just love it when folks use our pieces in creative ways!

Tuesday, April 19, 2011

vacation


Returning home from a vacation always seems a little surreal, relieving....yet strangely as though your brain hasn't caught up with your body and is still on the road. We traveled down to Florida for Spring Break, enjoyed the beaches, Disney, Epcot and the company of family.


The beach photos were taken at a secret spot in Venice, FL. My sister showed us the proper way to hunt for shark teeth and we were happily surprised by our findings. In the photo above, Max and I sift through shells and stones to find shark teeth.


At first, Max was pretty terrified by the huge expanse of water, but gradually grew more comfortable with getting wet (which made the adults reel with nerves!).


Max and Greg, happily traveling along!


My dad can't resist Max at all and loves to carry him around, which I totally understand. Our trip went surprisingly smooth, free of traffic jams or lost things. It felt wonderful to get away, especially after such a hectic few months of Azalea in theatre practice (she was a hedgehog in The Wind in the Willows ) and Greg gone nearly every weekend for shows. I'm glad we had the opportunity to relax before the yearly crush to make new things for the upcoming Bead and Button Show. Well, the vacation is over and its time to get to work!

Friday, April 15, 2011

Studded Bead Tutorial

Here's a quick tutorial for making studded beads (for more detailed information, check out my book Enchanted Adornments). Start by clearing an area away from dust or other small particles that could marr the surface of the clay, then use a piece of plexiglass, or a thin cutting board as your work surface. Gather the tools: *polymer clay (I like premo) *small picture hanging nails (I prefer the golden domed ones) *metal rod/mandrel to use as a handle and hole maker (I like steel ones used in lamp work) *wire cutters *oven *sculpting tools or cuticle stick *liquid polymer

Press conditioned polymer onto the mandrel until they are secured and not loose, then bake.


Apply liquid polymer clay in a thin layer.


Wrap bead with a layer of conditioned clay - this bead was wrapped twice.


Press out any air bubbles and smooth the surface carefully, too much force may loosen the bead.


Clip the nails with wire cutters or bolt cutters. I left about 3mm on the head.


Then push them into surface. This is a very satisfying step.


Then bake the finished bead....some of the nailheads got a little buried, but I don't mind.


Process: 1.Condition the polymer by kneading it until it is soft and warm. Don't skip this step, since it ensures completely mixed polymer which means stronger beads.


2.Decide how large you want your finished beads to be and roll out beads half that size. These will be the core beads that clay will be added to.


3. Push the clay beads onto the mandrel, compacting them to the metal so they adhere well.


4. Cure them in the oven at 275F for 15 minutes for every 1/4" thickness. Allow them to cool, or dunk them into cool water.


5. While the core beads are cooling, use wire cutters and trim the nails to about 1/8".


6. Apply a thin coat of liquid polymer to the cores (you can use a brush or your fingers), then roll out some conditioned clay and add a layer to the core bead, careful not to trap any air bubbles. This is best done by working from one end of the bead to the other, pushing out air as you press the clay onto the core.


7. Smooth the surface with your fingers, using the cuticle stick to get around the mandrel.


8. Press the trimmed nails into the clay and make a pattern or cover the surface. Smooth out any blemishes on the surface.


9. Cure the clay in the oven and while still warm, twist off the mandrel and cool. Tips: Rubbing alcohol works well to smooth uncured polymer clay. Twill works well to buff finished beads.